HDR Automation for Faster Bracketed Photos
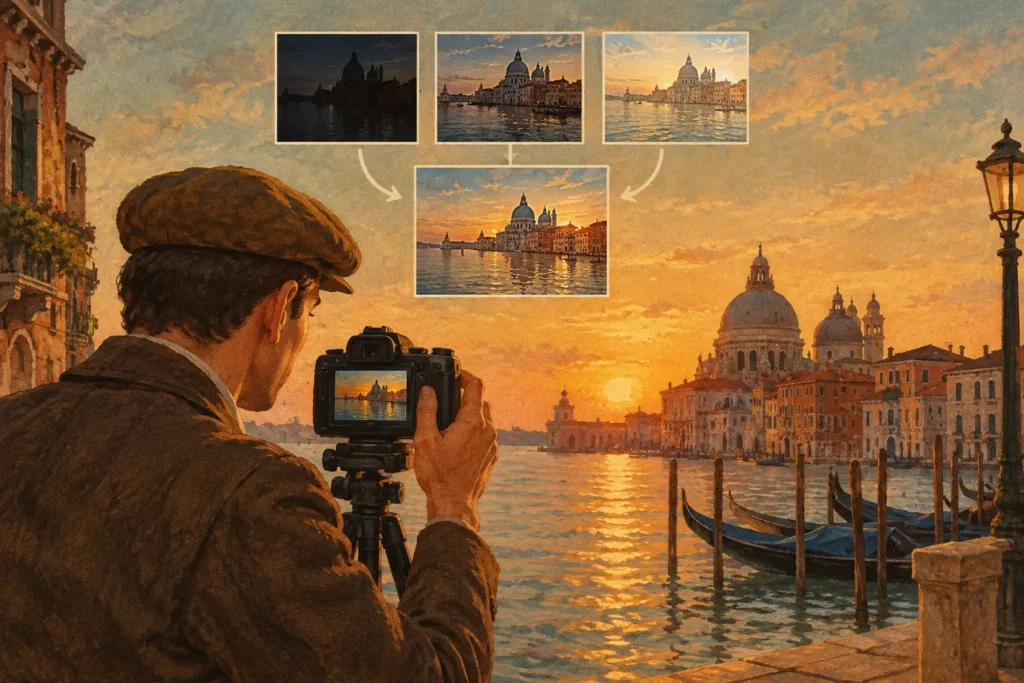
A three-frame bracket of a bright window, a shaded room, and a sunny exterior can look ordinary in a photo library. The work begins when you have to find its matching frames, confirm their order, align them, manage movement, and decide whether the final HDR image should look natural or pushed. HDR automation removes those repetitive steps while keeping the decisions that affect the photograph in your hands.
For photographers who regularly use auto exposure bracketing, the goal is not to hand every creative choice to software. It is to stop wasting time on predictable production work. A useful automated workflow should recognize related exposures, correct small shifts between frames, handle subject movement, and produce a full-resolution file that is ready for your library in seconds.
Why HDR automation matters after you shoot
A single exposure has limits. Expose for a bright sky and a foreground can become muddy. Expose for shadows in an interior and windows can clip to featureless white. Exposure bracketing solves the capture problem by recording several frames at different exposure values, usually three, five, or seven images.
The traditional problem is what happens next. Camera rolls rarely label a bracket set in a way that makes it easy to review. A travel shoot may include dozens of similar scenes. A real-estate session may contain repeated rooms, windows, and exterior views. Manually sorting frames is slow, and choosing the wrong near-identical image can lead to a bad merge.
HDR automation turns bracketed captures into a reliable production workflow. Instead of treating every set as a small editing project, it identifies the group, prepares the frames, and gives you controls where they matter most: motion, tone mapping, and export.
This matters especially when high-contrast scenes are part of the job. Landscapes with sunlit clouds, architecture with bright openings, waterfront scenes with reflections, and interior photography all benefit from preserving highlight and shadow detail in the same image.
Detect: find bracket sets without manual sorting
The first requirement is accurate detection. Exposure-bracketed frames may be captured seconds apart, but time alone is not enough to identify a true set. A photographer can shoot several unrelated images during the same minute, or shoot a burst near a bracket sequence.
A better approach uses EXIF metadata to recognize the exposure pattern and group frames that belong together. This is how an automated HDR workflow can distinguish a 3-, 5-, or 7-frame auto exposure bracketing sequence from ordinary photos in the same library.
That distinction sounds technical, but its practical benefit is simple: no manual sorting and no wasted brackets. You can review detected sets as sets rather than hunting through individual thumbnails. For a larger photo library, this is often the biggest time savings of all.
Detection should still be reviewable. Automation can identify likely groups quickly, but photographers should be able to choose which sets to merge and skip a bracket when the subject changed too much between exposures. The right workflow accelerates selection without pretending every capture deserves the same treatment.
Merge: alignment and deghosting solve different problems
Once a bracket set is identified, the software needs to combine it accurately. Alignment and deghosting are often mentioned together, but they solve different issues.
Alignment corrects small changes in camera position from one frame to the next. Even with careful handheld shooting, the camera can move slightly between exposures. On a tripod, vibration, a loose head, or a quick adjustment can create minor shifts. Without alignment, edges can look soft or doubled after merging.
Deghosting addresses movement within the scene. Leaves can move in wind, water can ripple, cars can pass through a street scene, and people can walk through an interior or exterior frame. If those moving areas are blended equally from every exposure, the final image can show translucent subjects or repeated outlines.
Four levels of deghosting provide a practical range of control. A low setting can preserve detail in a mostly still scene with subtle motion, such as calm water or distant foliage. A stronger setting is more useful when a moving person, vehicle, or tree branch would otherwise create visible artifacts. More correction is not automatically better. Heavy deghosting may prioritize one source frame in motion areas, so use the lowest level that removes distracting ghosts.
The same applies to alignment. It is valuable protection for handheld brackets, but it cannot fully repair a sequence where the composition changed substantially or the subject moved across a large part of the frame. HDR automation saves work, not physics. When a scene is extremely dynamic, a single exposure or a carefully timed bracket may produce the more believable result.
Choose a tone-mapped result that fits the scene
Merging exposures creates a file with more usable tonal information. Tone mapping determines how that information appears on screen and in the exported image. This is where HDR photographs can either look balanced and convincing or start to look overprocessed.
A natural tone map is often the right starting point for architecture, interiors, travel photography, and landscapes where believable light matters. It can retain window detail and open shadows without making every surface look equally bright. It is also a sensible choice when the image will be edited further.
A vivid look can work well when color separation and local contrast support the subject, such as a sunset landscape or textured outdoor scene. A dramatic treatment can emphasize contrast and detail more strongly. It can be effective for the right scene, but it deserves a careful review around skies, walls, skin tones, and shadow transitions.
The useful part of automation is speed, not a one-look-fits-all preset. Select a starting style, inspect the result at a meaningful size, and adjust based on the image. If a window frame develops halos, a blue sky turns unnatural, or shadow areas look noisy, pull back toward a more restrained treatment.
Export: keep the workflow fast and local
An HDR merge is only useful when it returns to the photo library in a format that fits the rest of your work. Full-resolution export protects detail for printing, cropping, and later editing. HEIC can be a practical option when you want efficient storage and easy sharing across Apple devices.
Local processing is equally important for many photographers. Bracketed images can include homes, client interiors, family travel, or location details that should not leave the device simply to be merged. A cloud-dependent workflow adds upload time, requires an account, and raises an unnecessary privacy question.
MergeHDR processes bracket detection, alignment, deghosting, tone mapping, and export on your device. Nothing uploads. That means you can work from your photo library on Mac, iPhone, or iPad without waiting for remote processing or sending sensitive images to a server.
A practical HDR automation workflow
A fast workflow begins before post-processing. Use auto exposure bracketing when the scene contains both bright highlights and meaningful shadow detail. Keep the composition as still as possible, especially around edges and architectural lines. If movement is likely, capture the sequence quickly and watch for people, foliage, and vehicles crossing key areas.
After shooting, review the detected bracket groups rather than individual frames. Merge the sets that contain a clear exposure range and a stable composition. Start with natural tone mapping, then increase deghosting only where motion is visible. Finally, export at full resolution when image quality is the priority, or use HEIC when storage and convenient sharing matter more.
This approach does not require a complex desktop HDR suite or a long checklist after every shoot. It gives you a repeatable path from capture to finished image: detect the brackets, merge the frames, and export the result.
The best HDR automation stays out of the way when the scene is simple and becomes valuable when the light is difficult. Your bracketed frames already contain the range you need. The practical advantage is turning them into a clean, usable photograph before manual sorting becomes the slowest part of your process.
Let MergeHDR find your brackets.
MergeHDR detects exposure brackets in your photo library and merges them into HDR photos on-device — keeping every edit, album, favorite, and location. No account; free to try, with unlimited saves for $19.99 once or $9.99/year on iPhone, iPad, and Mac.